
How to Create a MailChimp Portlet in Plone

Create a Mailchimp Portlet in Plone in a few simple steps! You only need to have access to the Zope Management Interface of your Plone site; that’s all. A MailChimp Plone integration that allows administators to set it up by themselves and then to choose this portlet from the drop-down list to inserting a portlet – without running a “buildout.”
When logged in as a site administrator, in the ZMI add a new ‘page template’ that will be the portlet for this specific use. Access the Zope Management Interface (ZMI) of your Plone site. In folder /portal/portal_skins/custom/ create a new object “Page Template” using the “ADD” pulldown (pulldown/PageTemplate):

Insert a name for this template into the Id filed, portlet_mailchimp, as seen here in this screenshot:

Click “Add and Edit“.
This adds the new template right into the /portal_skins/custom folder and brings you to an editable new page template with this code already in it:
    <html> <head> <title tal:content="template/title">The title</title> <meta http-equiv="content-type"
    content="text/html;charset=utf-8"> </head> <body> <h2><span tal:replace="here/title_or_id">content
    title or id</span> <span tal:condition="template/title" tal:replace="template/title">optional template title</span></h2>
    This is Page Template <em tal:content="template/id">template id</em>. </body> </html>
Override that code by pasting the following code into your new page template:


<html xmlns:tal="http://xml.zope.org/namespaces/tal" xmlns:metal="http://xml.zope.org/namespaces/metal" i18n:domain="plone">
<body> <div metal:define-macro="portlet"> <div id="portlet-signup"> [Add an id, for example 'portlet-signup']
<div> <div> <link href="//cdn-images.mailchimp.com/embedcode/classic-081711.css" rel="stylesheet" type="text/css">
<style type="text/css"> #mc_embed_signup{background:#FFF5D2; clear:left; font:12px Arial,sans-serif; width:200px;}
#mc_embed_signup .button {background-image: none;} #mc_embed_signup form {} #mc_embed_signup h2 {font-family:Arial,sans-serif;color:
#CC6600;border: 0 none;margin:0;padding: 0 0 15px;} #mc_embed_signup .asterisk {font-size: 110%;} #mc_embed_signup .mc-field-group
label {color: #666666;font-size: 90%;font-weight: normal;} #mc_embed_signup .indicates-required {color: #666666;font-size:
10px;}
/* Add your own MailChimp form style overrides in your site stylesheet or in this style block.
We recommend moving this block and the preceding CSS link to the HEAD of your HTML file. */
</style> <div id="mc_embed_signup"> <h5 style="padding:5px;color:#343434;">Enter here the text to display
before the header, h2</h5>
[Add your own MailChimp action form code below:]
<form action="http://yoururl.us1.list-manage.com/subscribe/post?u=creatednumbere&id=dcreatednumber" method="post"
id="mc-embedded-subscribe-form" name="mc-embedded-subscribe-form" target="_blank" novalidate> <h2>Enter Here Your
Title Text</h2> <div><span>*</span> indicates required</div> <div> <label for="mce-EMAIL">Email
Address <span>*</span> </label> <input type="email" value="" name="EMAIL" id="mce-EMAIL"> </div>
<div> <label for="mce-FNAME">First Name <span>*</span> </label> <input type="text" value=""
name="FNAME" id="mce-FNAME"> </div> <div> <label for="mce-LNAME">Last Name <span>*</span>
</label> <input type="text" value="" name="LNAME" id="mce-LNAME"> </div> <div id="mce-responses">
<div id="mce-error-response" style="display:none"></div> <div id="mce-success-response" style="display:none"></div>
</div> <div><input type="submit" value="Subscribe" name="subscribe" id="mc-embedded-subscribe"></div>
</form> </div> </div> </div> </div> </div> </body> </html>
Customize The Code To Adjust The Portlet
Enter your custom changes to this newly created page template: adjust the CSS to your needs and replace the code generated from your MailChimp form creator to <form action=… .
Give the portlet a relevant name, for example <div id=”portlet-signup“> .
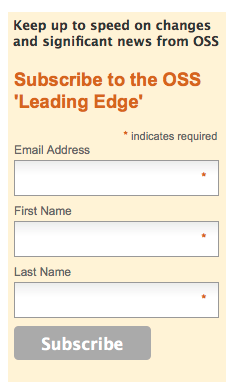
Adjusting the CSS and entering your text inside the h2 and h5 tag, gives the look we want, as in this screenshot – or on the live site: http://ossfoundation.us/
Add The Potlet

Navigate to the section on your Plone site where you would like to have the Mailchimp Portlet appear, for example on the home page, click the “Manage Portlets” link in the side bar and chose from the pull-down menu to add a “Classic Portlet.”
You could do this step also by adding this to your site’s URL: /@@manage-portlets
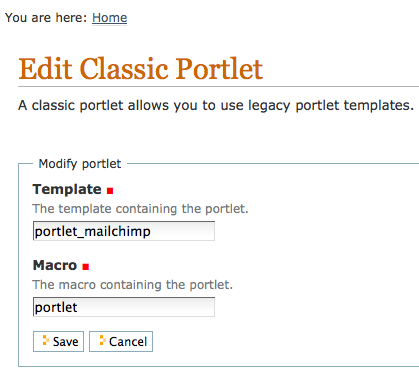
Enter the name of the template we created in step one “portlet_mailchimp” into the field “Template, ” and leave the field “Macro” as “portlet.”
If you are the site administrator of a Plone site and would like to understand how to manage the portlets in Plone version 3, this article from Rob Porter is helpful.
If you have a Plone3 or Plone4 site and a MailChimp account go ahead and try it out and please share your feedback or input.

